GCP
The GCP compute provider lets Transformer Lab launch ephemeral Google Compute Engine VMs for training jobs directly from your Google Cloud project. Each job gets its own VM, which self-terminates when the job finishes or crashes.
The GCP provider is currently in beta.
How It Works
When you run a training task on a GCP provider, Transformer Lab:
- Ensures a firewall rule exists on the
defaultVPC that allows SSH to instances taggedtransformerlab-compute. - Launches a new Compute Engine VM in the configured zone using a Deep Learning VM image (for GPU jobs) or an Ubuntu 22.04 image (for CPU jobs).
- Attaches your service account to the VM so it can call the Compute Engine API to delete itself.
- Streams logs back over SSH while the job runs.
- The VM deletes itself (and its boot disk) when the job completes or fails.
All VMs are labelled with your team ID (transformerlab-team-id) and cluster name (transformerlab-cluster-name), and tagged transformerlab-compute.
Prerequisites
- A Google Cloud project with the Compute Engine API enabled.
- Permission to create service accounts and grant IAM roles in that project.
Transformer Lab authenticates to GCP using a service account key (JSON). You will create one below.
Step 1: Enable the Compute Engine API
- Open the Google Cloud Console and select your project.
- Navigate to APIs & Services → Library, search for Compute Engine API, and click Enable.
Step 2: Create a Service Account
- In the Cloud Console, go to IAM & Admin → Service Accounts.
- Click Create service account.
- Give it a name such as
transformerlab-computeand click Create and continue. - On the Grant this service account access to project step, add the following roles:
| Role | Why It Is Needed |
|---|---|
Compute Admin (roles/compute.admin) | Create, read, and delete VMs, disks, and firewall rules |
Service Account User (roles/iam.serviceAccountUser) | Attach the service account to launched VMs so each VM can delete itself on completion |
- Click Done.
If Compute Admin is broader than you want, see Required GCP Permissions Reference below for the minimum operations Transformer Lab actually performs. You can build a custom role from that list.
Generate a JSON key
- Open the newly created service account and go to the Keys tab.
- Click Add key → Create new key, choose JSON, and click Create.
- The key file downloads automatically. Open it in a text editor — you will paste its contents into Transformer Lab in the next step.
Treat the key file like a password. Anyone with the JSON can launch resources in your project. Store it securely and delete the local copy once it is added to Transformer Lab.
Step 3: Add the Provider in Transformer Lab
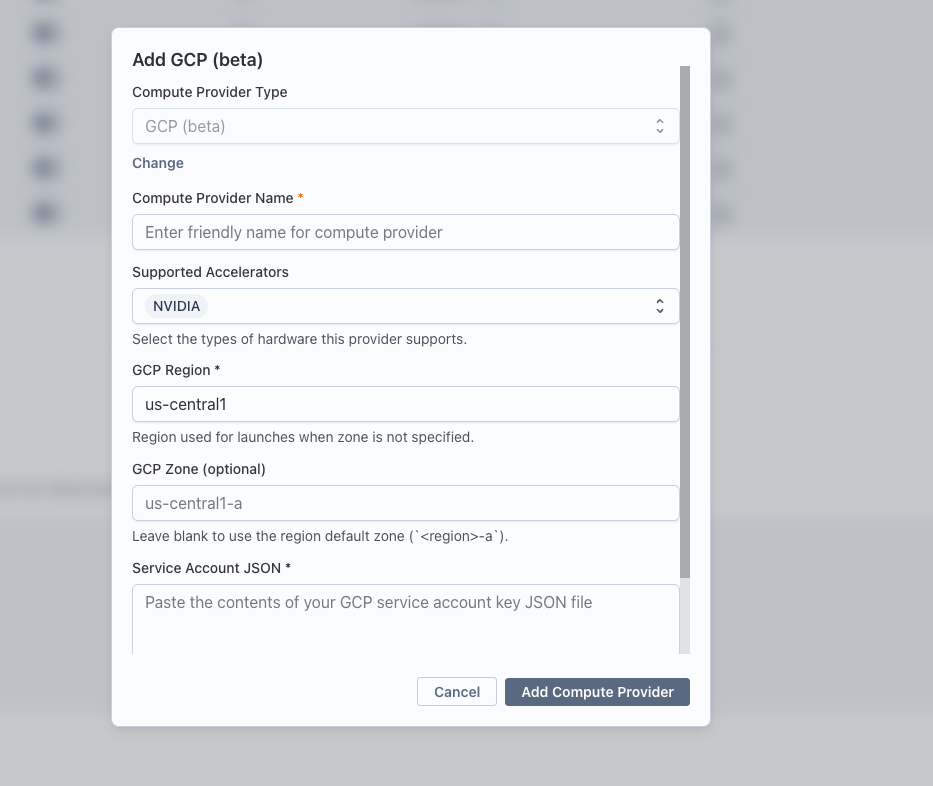
- In Transformer Lab, open the Team page and go to Compute Providers.
- Click Add Compute Provider and choose GCP (beta).
- Fill in the fields:
| Field | Description |
|---|---|
| Compute Provider Name | A friendly display name (e.g. My GCP US-Central) |
| GCP Region | Region used for launches when zone is not specified (e.g. us-central1) |
| GCP Zone (optional) | Specific zone to launch in (e.g. us-central1-a). Leave blank to default to <region>-a. |
| Service Account JSON | Paste the entire contents of the JSON key file from Step 2. The project_id is read from this file. |
- Click Add Compute Provider.
Transformer Lab will validate the credentials by making a lightweight Compute Engine API call. If validation fails, double-check that the Compute Engine API is enabled and that the service account has the roles above.
Step 4: Select the Provider for a Job
When creating a training task, expand the Compute section and select your new GCP provider. Enter the GPU resources required, then submit the job.
Resources Created Automatically
Transformer Lab creates these in your project and reuses them on subsequent launches:
| Resource | Name Pattern | Purpose |
|---|---|---|
| Firewall rule | tfl-<team_id>-ssh | Allows SSH (port 22) inbound to instances tagged transformerlab-compute on the default VPC |
| VM (per job) | Derived from cluster name | Runs the training job; self-deletes on completion |
| Boot disk (per VM) | Auto-named with the VM | pd-balanced disk, deleted automatically with the VM |
VMs are launched on the project's default network with an ephemeral external IP (one-to-one NAT) so Transformer Lab can SSH in and stream logs.
Supported GPU Types
Specify GPUs as <type>:<count> in task configuration (e.g. A100:8).
| GPU | Available Counts | Compute Engine Machine Type |
|---|---|---|
| T4 | 1, 2, 4 | n1-standard-* + attached nvidia-tesla-t4 |
| V100 | 1, 4 | n1-standard-* + attached nvidia-tesla-v100 |
| P100 | 1, 4 | n1-standard-* + attached nvidia-tesla-p100 |
| L4 | 1, 4, 8 | g2-standard-* |
| A100 | 1, 2, 4, 8 | a2-highgpu-*g |
| A100-80GB | 1, 2, 4, 8 | a2-ultragpu-*g |
| H100 | 8 | a3-highgpu-8g |
CPU-only instances are also supported. Transformer Lab picks the smallest of e2-standard-2/4/8/16 or n2-standard-32/48/64/80/96 that satisfies the vCPU and memory requested by your task.
Not every machine type and accelerator is available in every zone. If a launch fails with a quota or availability error, try a different zone (e.g. switch from us-central1-a to us-central1-c) or request a quota increase under IAM & Admin → Quotas.
Required GCP Permissions Reference
The following table lists the operations Transformer Lab performs against the Compute Engine API. The pre-built Compute Admin role covers all of them; you can also assemble a custom role with just these.
Compute Engine
| Operation | Why |
|---|---|
compute.machineTypes.list | Provider health check on startup |
compute.instances.create | Launch a VM for each job |
compute.instances.get / list | Look up an instance by cluster name and poll status |
compute.instances.delete | Stop/remove a VM on demand and during self-termination |
compute.instances.setMetadata | Inject the SSH public key and startup script |
compute.disks.create | Create the boot disk attached to each VM |
compute.acceleratorTypes.get | Resolve GPU accelerator URLs |
Networking
| Operation | Why |
|---|---|
compute.firewalls.get / create | Ensure the per-team SSH firewall rule exists on the default VPC |
compute.networks.use | Attach the VM NIC to the default network |
IAM (VM self-termination)
| Operation | Why |
|---|---|
iam.serviceAccounts.actAs | Attach your service account to each VM so it can call instances.delete on itself |
The Service Account User role grants iam.serviceAccounts.actAs. The Compute Admin role covers everything else listed above.
Troubleshooting
Credential validation fails immediately after adding the provider
- Confirm the Compute Engine API is enabled in the project the service account belongs to.
- Confirm both Compute Admin and Service Account User are granted to the service account, not to a user.
- Make sure the JSON key has not been revoked under IAM & Admin → Service Accounts → Keys.
"Image family not found" when launching a GPU VM
GCP periodically rotates Deep Learning VM image families. Transformer Lab tries several fallback families automatically, but if all of them fail, the project may not have access to the deeplearning-platform-release images. Check that your organization policy allows pulling from that public project, or pin a specific image by setting the provider's gpu_image extra config to a valid image URL.
Quota or availability errors
- Compute Engine GPU quotas are zonal. Open IAM & Admin → Quotas, filter by the GPU type (e.g.
NVIDIA A100 GPUs), and request an increase in your target region. - Some accelerators (notably H100 and A100-80GB) are only available in a subset of zones. Try a different zone or region if a launch fails with
ZONE_RESOURCE_POOL_EXHAUSTED.
VM launches but produces no logs
- The VM may still be bootstrapping. Deep Learning VM images can take several minutes to install drivers on first boot.
- Verify that no organization-level firewall policy overrides the team SSH firewall rule on the
defaultnetwork.
VM does not delete itself after the job finishes
The VM uses its attached service account to call instances.delete on itself. If self-termination fails, confirm the service account still has Compute Admin (or at minimum compute.instances.delete) on the project. You can always manually delete leftover VMs from the Cloud Console under Compute Engine → VM instances.